Employee Import
Employee Import
- — Download Sample Import Data File
Points to be noted, before importing the employee_data_sample.csv file
Importing Employee Data
- — Choose Column Section
This module is used to import the existing employee's records/data of the school. We have included a sample data file named “EmployeeSampleDataImport.csv”.
An Excel file where you can just enter the data of your school, replace the data of the required columns with your data and so you have the ready to import data file.
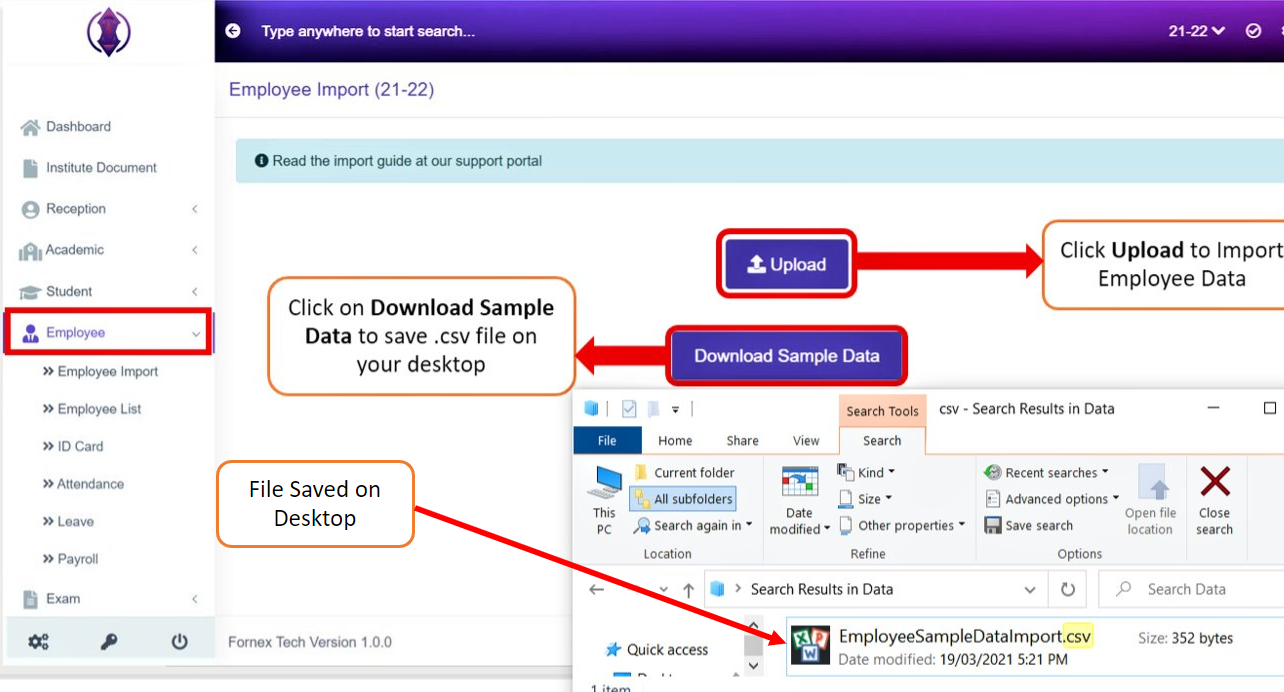
Figure 1Download Sample Import Data File:
Click on “Download Sample Data”, refer figure:1, and save as pop up window opens, save it to your desktop. Once the Employee_Data_Sample.csv file is saved to desktop, open the fill and replace the data of the required columns and click Save.
Points to be noted, before importing the employee_data_sample.csv file:
1. The required data should be entered in Sample Data excel file and file should be saved as .csv file format only, and can be saved, with any file name of your choice.
Example: employeedata2021.CSV file
2. The below data should be created in Institute Management System (IMS) prior importing the data file to IMS.
Department - Mandatory (Configuration -> Module Configuration -> Employee Configuration)
Designation - Mandatory (Configuration -> Module Configuration -> Employee Configuration)
Religion - Optional (Configuration -> Module Configuration -> Misc Configuration)
Blood Group – Optional (Configuration -> Misc Configuration Tab)
Category – Optional (Configuration -> Misc Configuration Tab)
Caste – Optional (Configuration -> Misc Configuration Tab).
3. The Department and Designation are mandatory data fields, it needs to be created first, in Institute Management System (IMS), before importing the employee data file.
4.The below are mandatory Fields/Columns in Employee Data Sample file
Note:
Date of joining: One can also import Employee's that are going to join the institution after a week or month by giving the joining date as the date that the employee is going to start their job from i.e., The date of joining of an employee could also be a date in future.
However, their status in the employee list will be inactive. The status will display active on the date of joining given by the admin
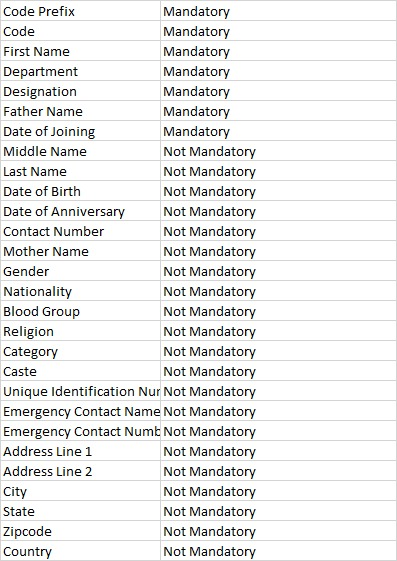
Figure 2
5. If Columns in the excel sheet, Example: Data of Birth, Gender, Religion, Emergency Contact Number, Unique Identification Number, Caste, etc. are left empty and the data is imported to the system, then you have to manually, enter each employee's records data and fill each fields manually, which can consume more time and efforts. Hence, it is useful to fill all the required data before importing the excel file to the IMS.
Importing Employee Data:
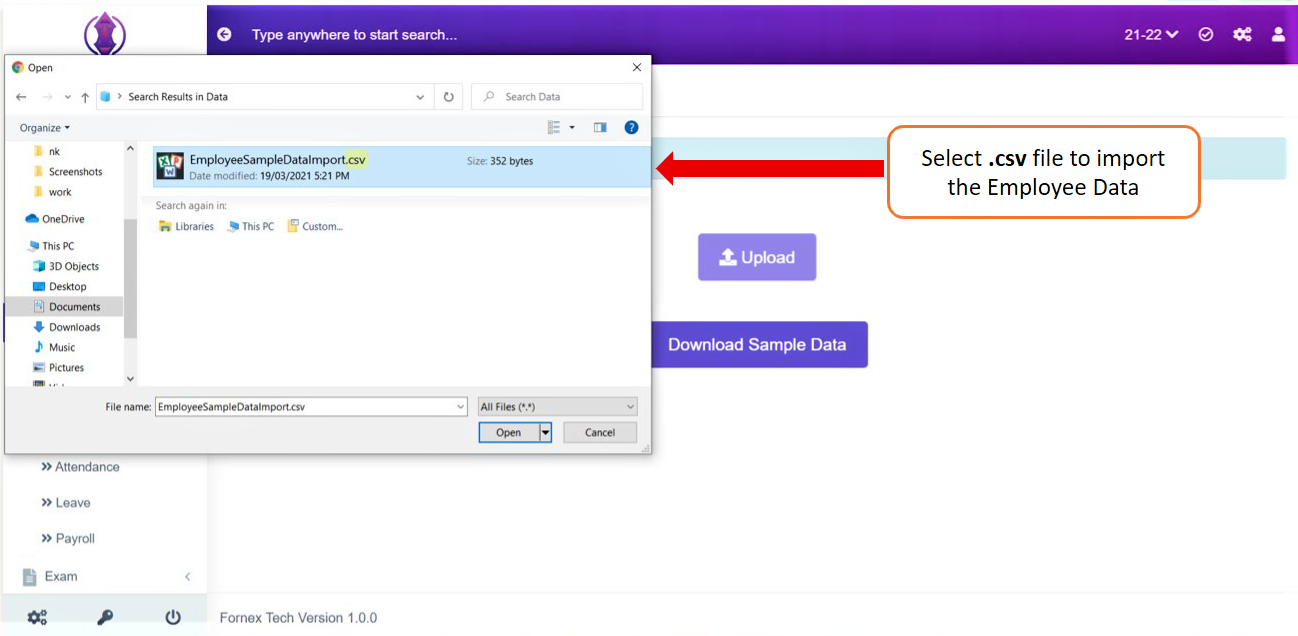
Figure 3Pop up window comes as below to select the file.
Select the excel .csv file, to import the Employee Data, select open, see Figure: 3, file
Ex: here we are selecting the file name as “employee_data_sample.csv” file, where data has been entered and saved.

Figure 4Once the data is imported successfully without any validation error message, Figure: 5, screen page is displayed and it is your complete Employee's Data. The number of Employees and their data in all columns, of the excel sheet will get imported. Below it is the choose Column Section.
Choose Column Section:
This section is optional. It helps you to choose the required option from the drop-down list, to match and import your employees record. If excel sheet columns are not the same as the Columns Fields Name of header, of the Employee_Data_Sample excel sheet which we provided in IMS, in that case, this section is useful.
Below is an Example:
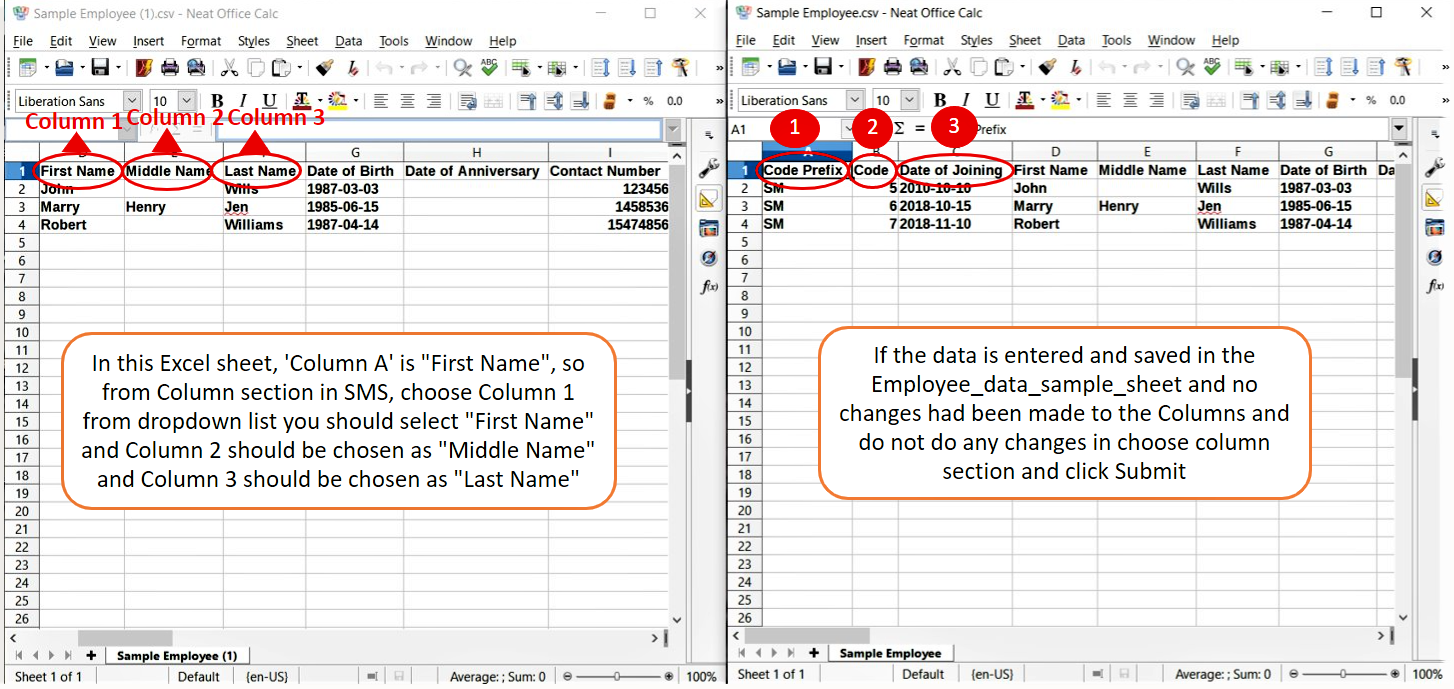
Figure 5
Importing Excel File 1
Importing Employee Data sample Excel file
On the left side of the excel sheet, in Figure 5, Column A is “First Name, column B is “Middle Name” … Here columns are different to the Employee_Data_Sample.csv excel file, which we have provided, you should select the Column name from the drop-down list. So, in the Choose Column section see in Figure 4, In Column 1 select, First Name and in Column 2, select Middle Name and in Column 3 select Last Name…. and so on.
So, Choose Column section - it is used, if the columns are different in the excel sheet which you are importing, you can use the choose column and match the column names by using the drop-down list.
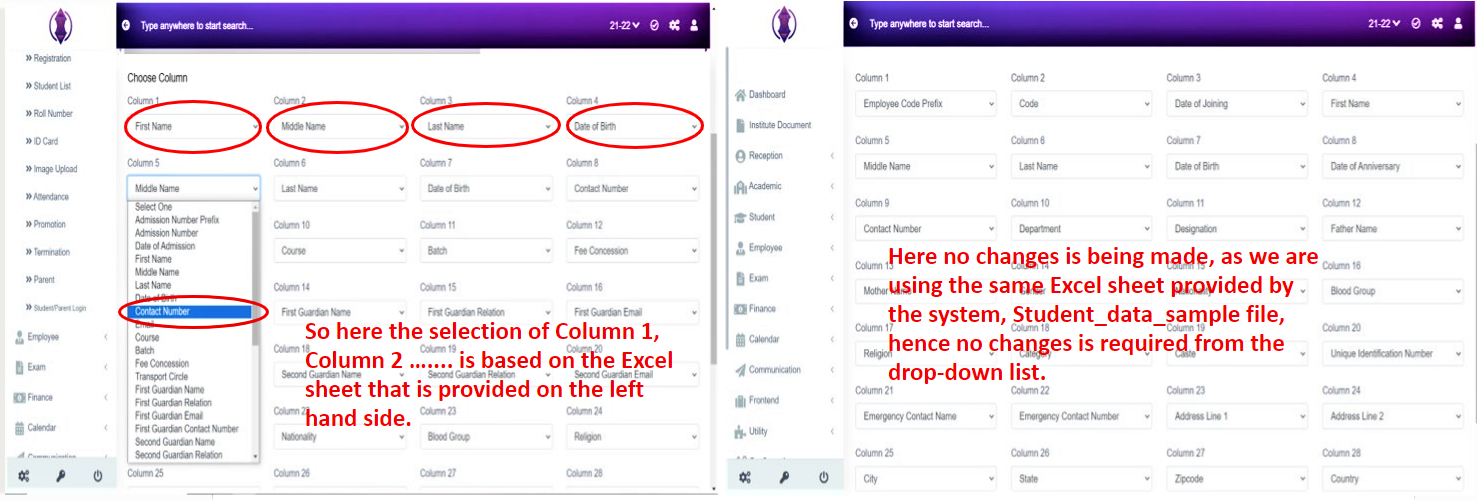
Figure 6
Imported Excel File 1
Imported Employee Data sample Excel file
If you have used Employee_data_sample.csv excel file, which is provided and no changes have been made to the columns Field Names, and data is entered according to the Column Field Name of the header of the file, then, do not make any changes to the columns in the choose column section. In both the above Figure:6, screen scenarios, do as required, and just click “Submit button”, see figure:7 and your data will get imported Successfully.
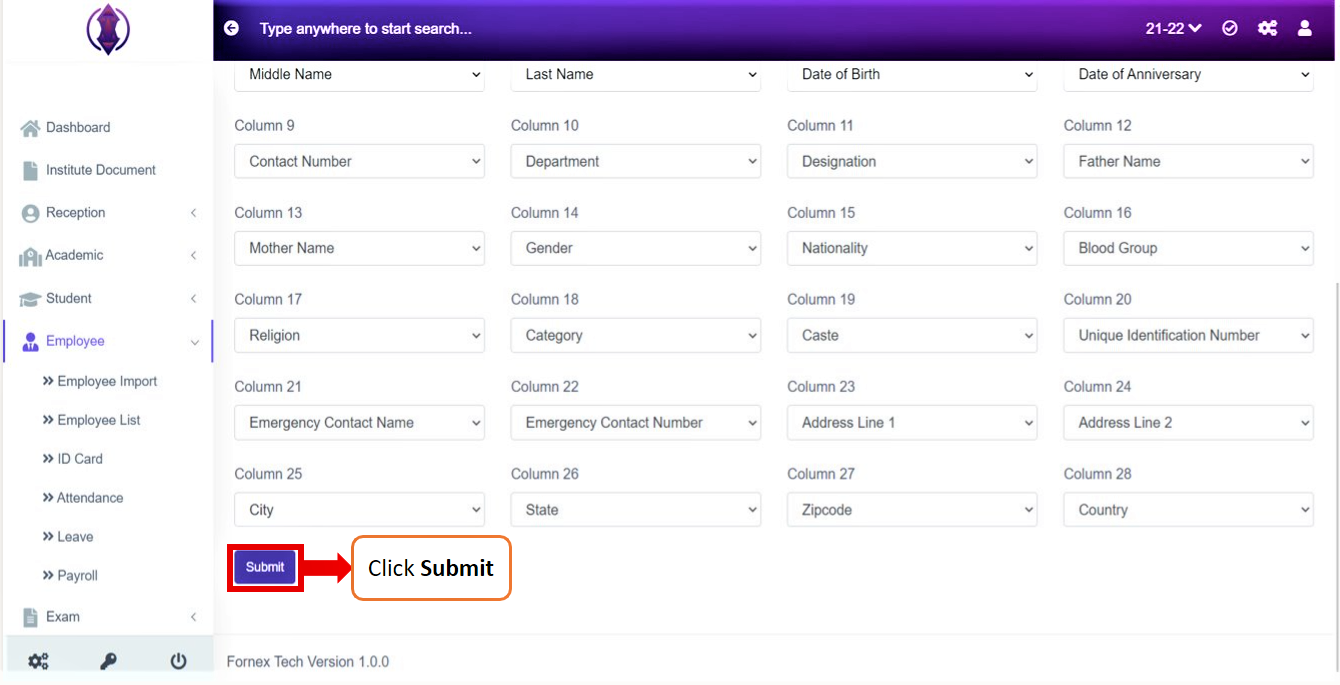
Figure 7
Figure 8Once the Employee data file is imported successfully, you will see the Green pop up message to bottom right, refer figure:8, as “Employee Imported” and the page, will be automatically redirect to, Employee List Page, refer figure:9.
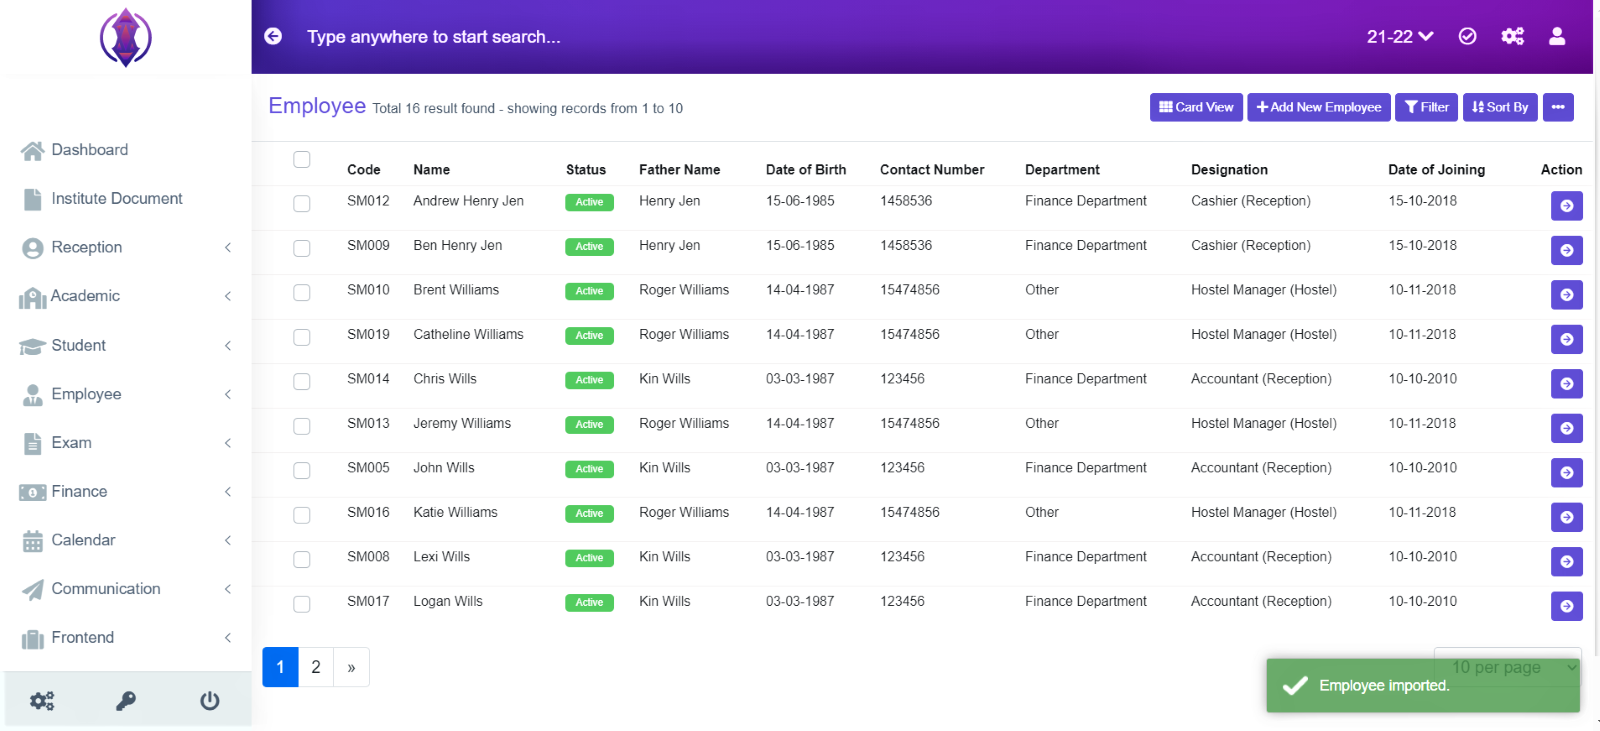
Figure 9