Reception
Reception Tab
- — Add New Enquiry Details
Form Fields Description
- — Date of Enquiry
- — Enquiry Type & Enquiry Source
- — Email & Contact Number
- — First, Second & Third Guardian Name & Relation
- — Remarks
Students’ records form - Group Field Description
- — Add New Student Tab
Data Table View Description
- — Add New Enquiry Tab
This Module, helps to create and track all enquires, do a follow-up and so you would not miss any enquiry record.
The example of enquiries which can be created and tracked are as below:
Example:
Admission Enquiry
Student Health Enquiry
Student Teasing Enquiry
Student Transfer Enquiry
To Add New Enquiry Details:
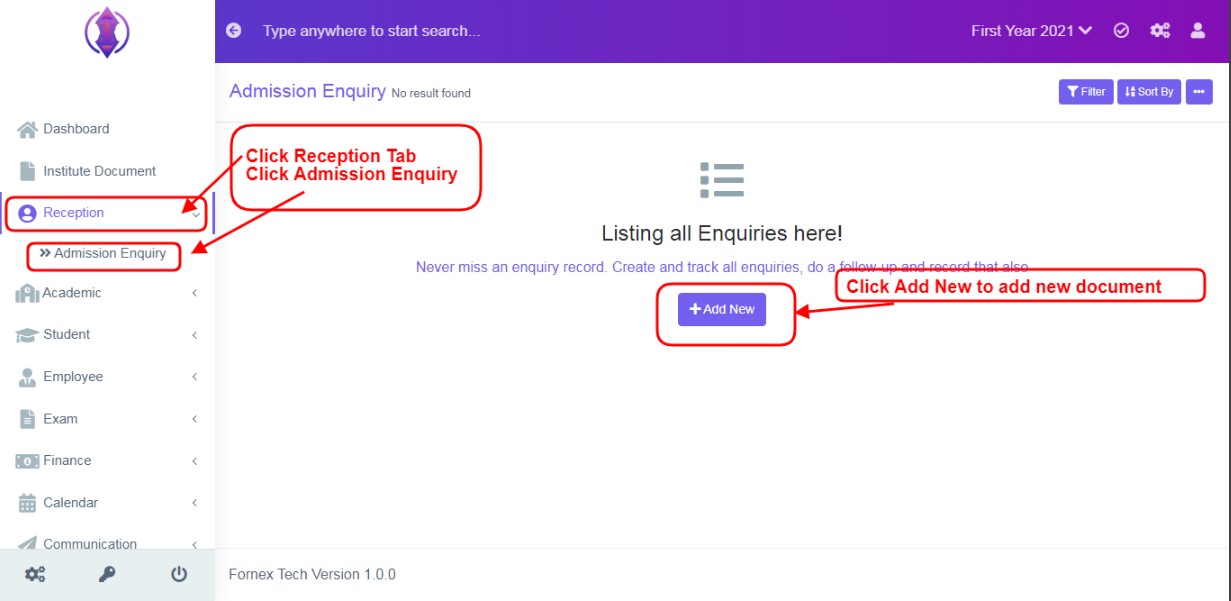
Figure 1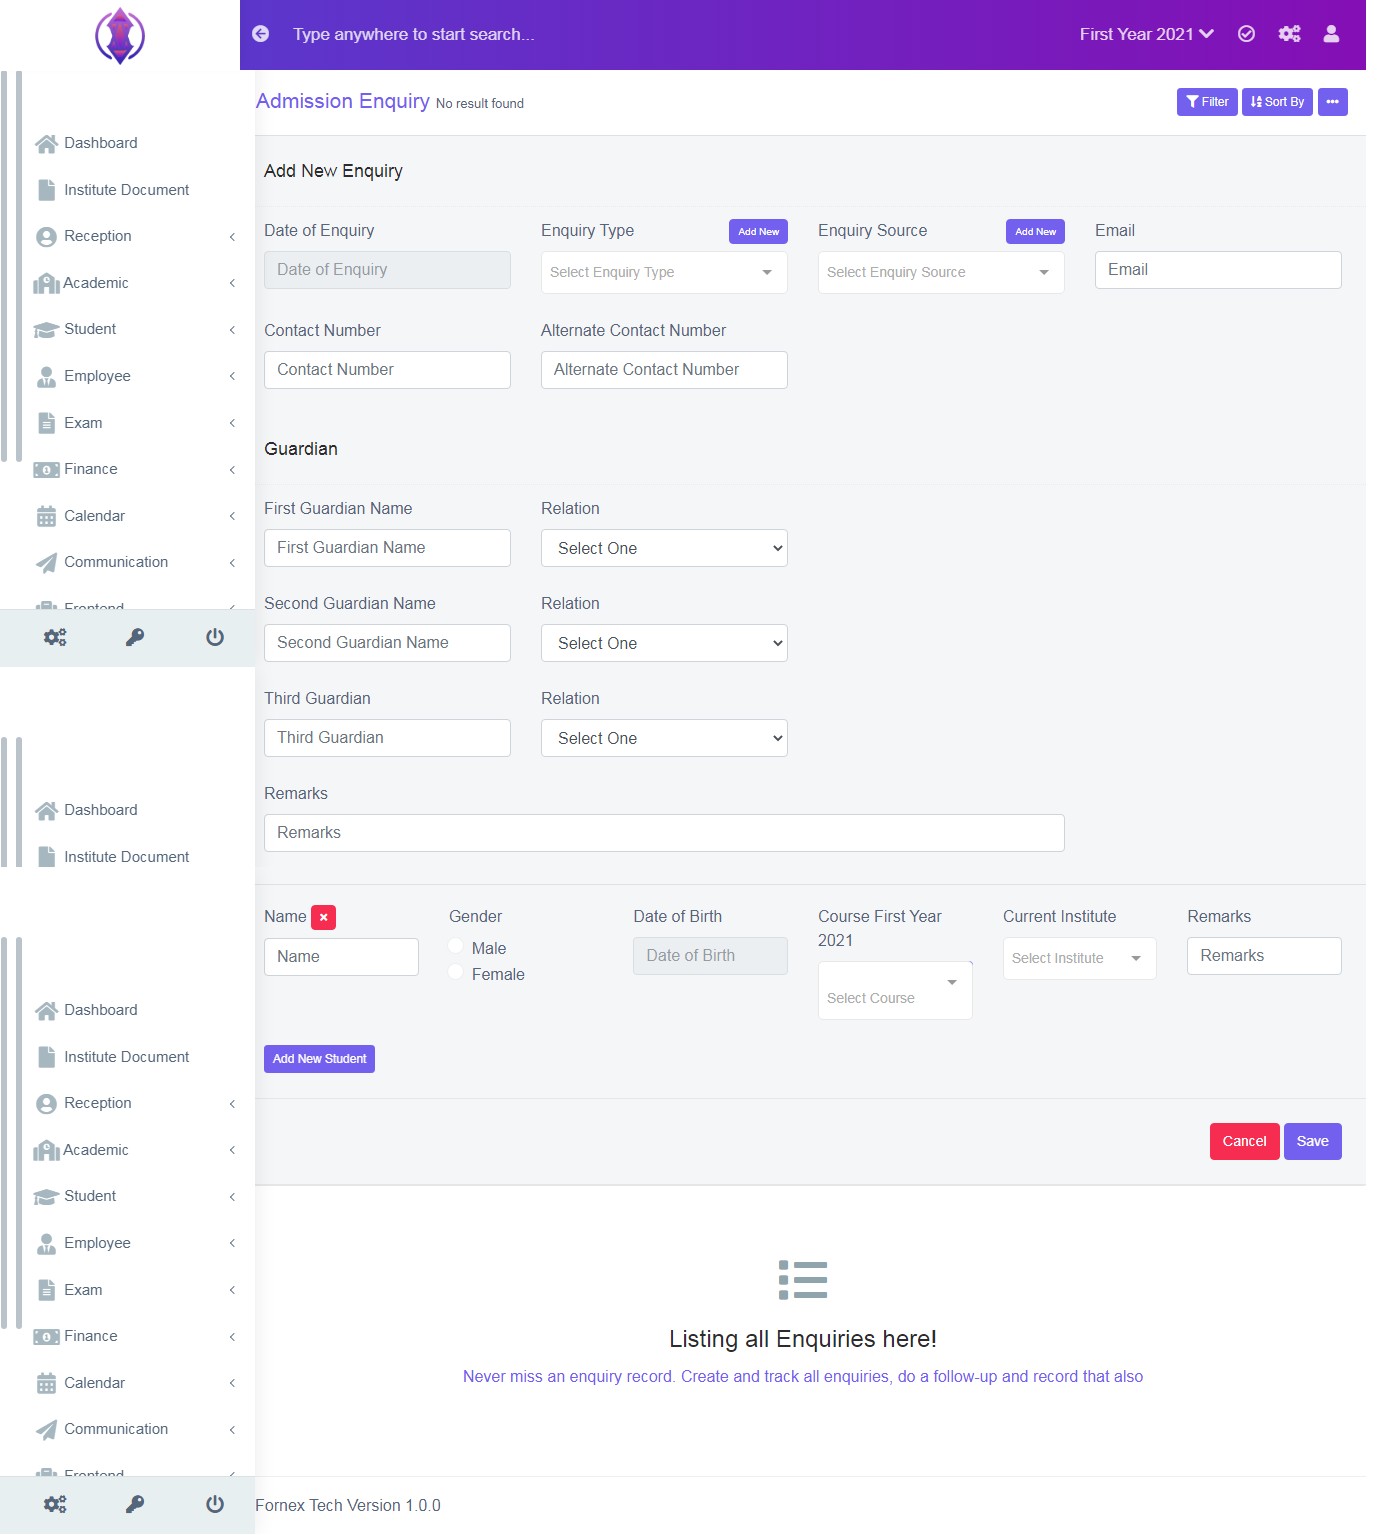
Figure 2To add a new enquiry, click on ‘Reception Tab’, and click on ‘Admission Enquiry’, refer figure:1, and click on ‘Add New’ and new screen to enter data is displayed, refer figure:2, and enter the data in to their respective form fields.
Form Fields Description:
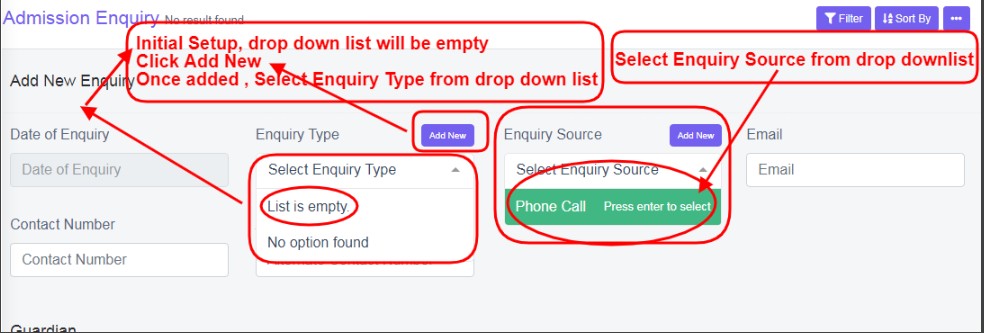
Figure 3Date of Enquiry
This field is to record the date of enquiry, when it was/is done. Select the date of enquiry, from the calendar view, which you want to record the details. Refer figure:3. This Field is Mandatory
Enquiry Type & Enquiry Source
Enquiry Type can be assigned as a specific category of the enquiry, which is being made.Ex: admission enquiry, health enquiry, teasing enquiry etc. Enquiry Source is nothing but source of communication which was used to make the enquiry. Ex: Email, Phone or Office Visit etc. This Field is Mandatory.
Select enquiry type and enquiry source from the drop down list. Ex: Refer figure:3
In the initial stage of setup of management system, you see the drop-down list only as “list is empty” is displayed, refer figure:3 and is empty. In order to select, specific Enquiry Type & Source, click ‘Add New’ tab  , a pop up screen will be displayed in the middle of the screen as below, Enter Name – Mandatory Field and Description - Optional Field, as required and click save. Refer figure:4.
Enter the email address of enquiry person. This Field is optional. For Contact number, enter the phone number of enquiry person. This Field is Mandatory.
First, Second & Third Guardian Name & Relation
Enter the Full name of the guardian, in the name field and select their relation, i.e. between enquiry person and student, from the drop-down list, as, Father, Mother, Spouse or Other, in the relation field. First Guardian Name & Relation is Mandatory. Other two is optional.

Figure 5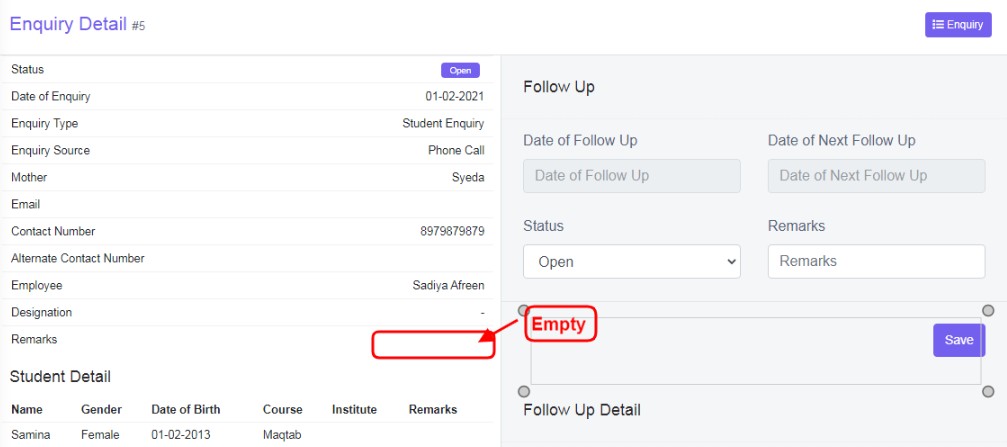
Figure 6Remarks:
The remark of the Caller/Enquirer. Enter the summary of the record which was/is being noted down of the enquirer. This can be readable in the data table view – remark column. This Field is optional.
If this field is left empty, the remark field column will be empty in the data table view remarks column, highlighted in yellow - refer figure:5, and in the edit Enquiry Details of the student, of remarks field data view. refer figure:6.
Students’ records form - Group Field Description

Figure 7The section is single or group of Students’ record form. This is to, add the record about the students, the enquirer contacted the institute for. Enquired persons’ Student Name, Gender, Date of Birth, Course, Current Institute and Remarks Fields.
Name:
Enter the Name of the Student, for the details to be recorded, the enquirer was/is discussing about. This Field is Mandatory.
Gender:
Select the gender of the student, Male or Female. This Field is Mandatory.
Date of Birth:
Select the date of birth of the student from the calendar view. This Field is Mandatory.
Course:
First Year 2021: Select the course of the student which they belong to or enquiring about (Enrolled or Non-Enrolled Enquires of Students’) from the drop down list. This Field is Mandatory.
Current Institute:
Select the current Institute name of the student which they belong to or shifting/transferring. (Non-Enrolled Enquires of Students’) from the drop down list. This Field is optional.
In the initial stage of setup of the management system, you see the drop-down list as “list is empty – No option found” is displayed 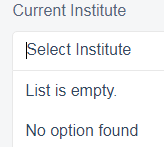 and is empty. Refer Points to be noted 2, to know how to add current institute.
To edit and change the name of current institute or want delete it from drop down list. Go to Module Configuration. Refer Points to be Noted 4 for more details.
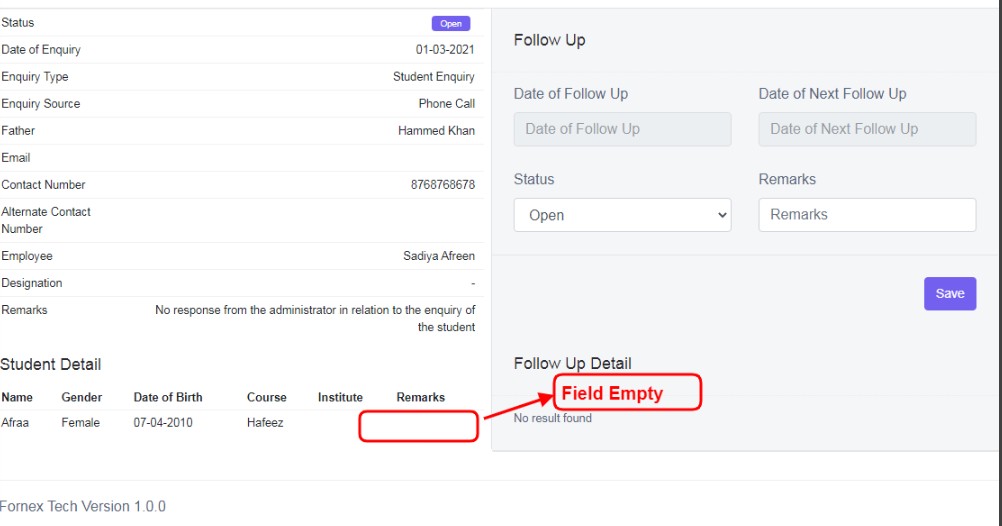
Figure 8Remark:Enter the summary of record which is to be followed, for the student. This Field is optional.
If this field is left empty, the remark field will be empty, in the edit Enquiry Details of the student, refer figure:8.
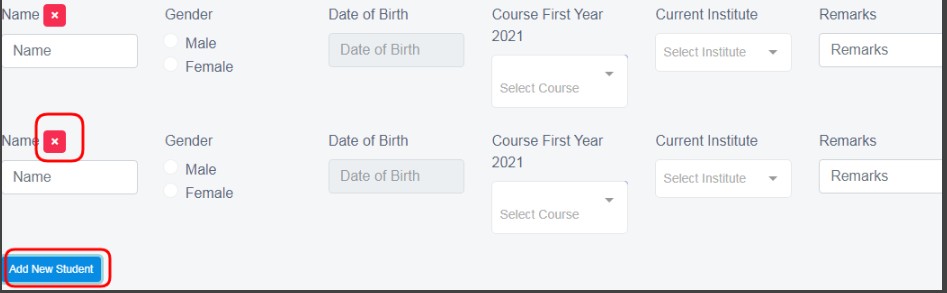
Figure 9Add New Student Tab:
This is to, add the information about the students’, the enquirer contacted the institute for. Students’ Name, Gender, Date of Birth, Course, Current Institute and Remarks Fields. Refer figure:9.
If the enquiry is about more than one student ex: Enquiry about 2 student,3 Student.or any number of student,click Add New Student Tab and another line of same fields as above, will be added underneath. Fill the required fields in form-group section and save.

Figure 10After the required information is entered, click “Save”, a popup message appears in Green as “Enquiry added”, refer figure:10.
Once the enquiries details are saved, all the added enquiry information can be viewed at one place, at front–end in Data Table View, refer figure:11 – Data table View.
Data Table View Description:
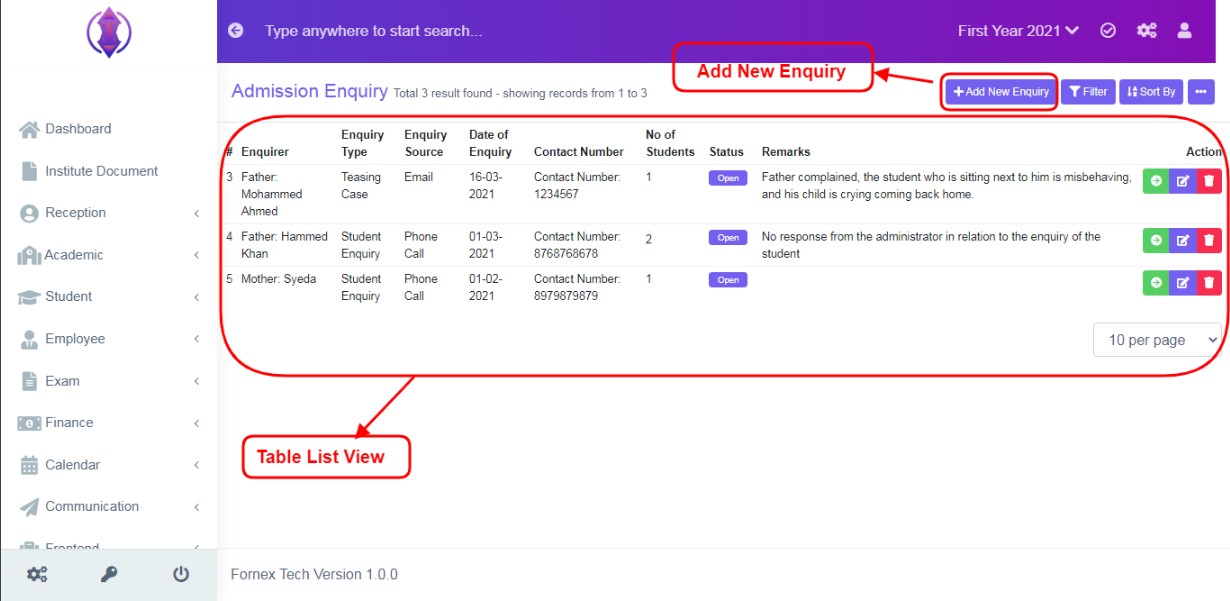
Figure 11
Data Table View Important Fields Description:
Add New Enquiry Tab:
If you have already added the enquiry details, it is visible in the data table view, the “Add New Enquiry tab, will get shifted to top-right hand side, of the page title bar, refer figure :11.
Enquiry:
It is the information about the Guardian, who contacted for the enquiry.
No of Students:
If the enquiry is about more than one student and their information is added to the form group section see figure:9, of the new enquiry form. Then the number of students’ information added there will be displayed in data table view in numbers.
Status:
The status column, shows the status of the enquiry as open, partially close, closed and missed. This status can be edited and assigned in view enquiry details, every time the follow up is done. For more information, refer, View Enquiry Details.
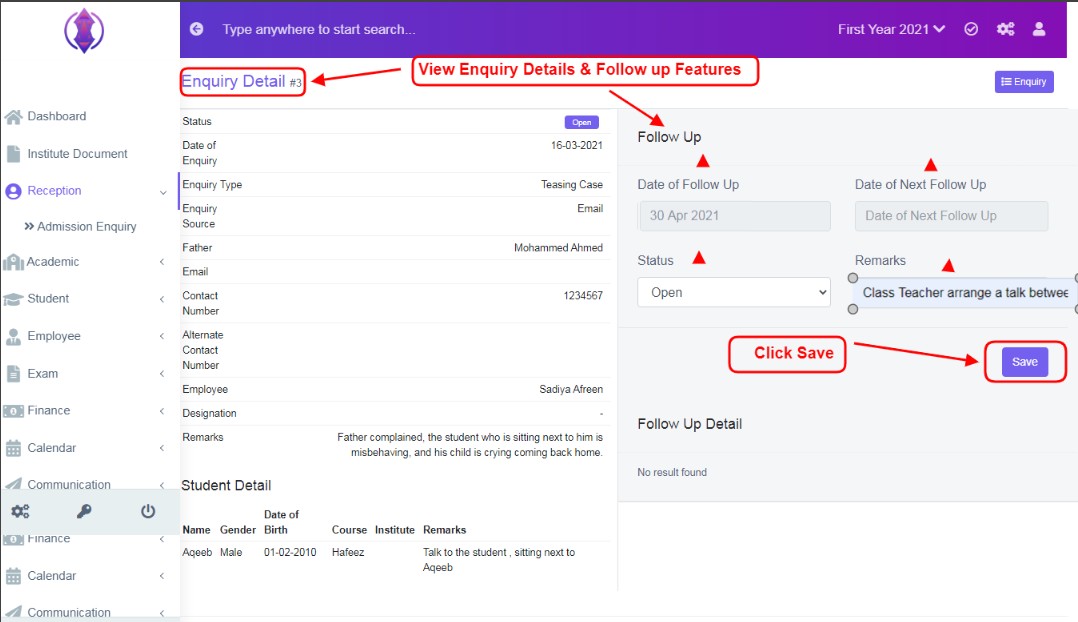
Figure 12 View Enquiry Details:To View and follow the enquiry, click  from the Actions, and a screen is displayed, to follow up the enquiry, refer figure:12.
Follow up includes selecting dates of follow-up, selecting status, and enter remarks.
from the Actions, and a screen is displayed, to follow up the enquiry, refer figure:12.
Follow up includes selecting dates of follow-up, selecting status, and enter remarks.
Open:Open status, can be used, once new enquiry is added.
Partially Close:If an action is taken by the required team from the school, it can be marked, as partially closed.
Closed:Once the required action is completed successfully, it can be marked as closed
Missed:If the required action to be taken, days is passed or due to some other reasons enquiry is missed, it can be marked as missed.
Date of Follow up and Remarks Fields are mandatory.
Enter the required data in to the respective fields, once done click ‘Save’.
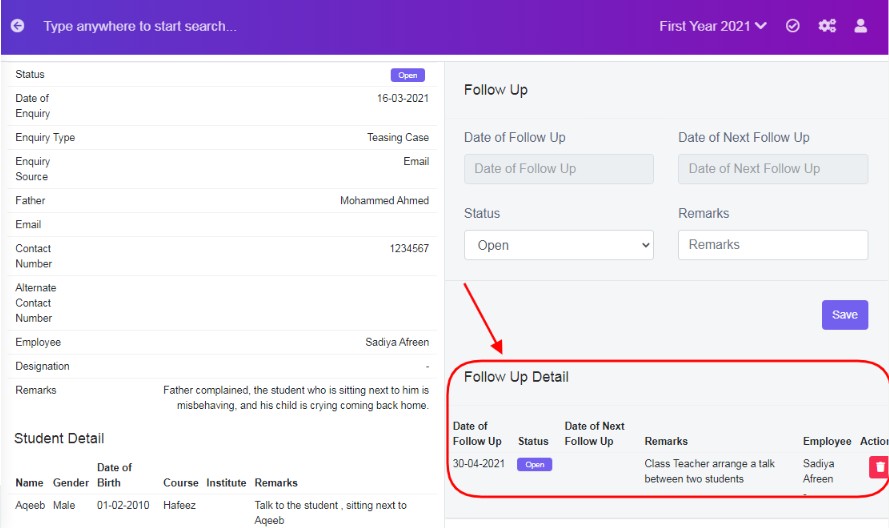
Figure 13Follow up Details Section:
Once Follow up is saved, its details are displayed at the bottom right hand side of the screen. You can record, as my as follow up with dates and remarks, and its related details will be listed in Follow Up Detail section. Refer figure:13.
The Employee who login and edits the follow up details, there name is shown in the Employee Column.Ex: Respective class teacher, Counsellor, Manager, can login and do a follow up. Refer *figure*:13. Actions button delete is used to delete any follow-up.
Edit Enquiry Details:
To edit the existing document click  icon and a screen will be displayed to Edit Enquiry. Fill the required information, to do the changes to the form fields or to add more students. Once done, click ‘Save’, to save the changes. “Enquiry updated”, green popup screen will be displayed on the bottom right hand side of the screen.
Delete Enquiry Details:
To delete , the saved enquiry details and its follow up data, forever, click delete  icon and a pop up screen comes up, asking for your confirmation
  to proceed with the request, click, continue, to delete the data or click close to go back to the data table view. Data will get deleted from the database and it cannot be retrieved again.
You can use Filter Fields, Sort By List, from more options, Print and Generate PDF, to view and print the displayed data table view data according to your requirements.